Replace Clothing in Photoshop With Product References
A stylist wants to see a different sweater on the same model. A retoucher needs to replace a shoe without rebuilding the whole photograph. A merchandising team wants to review how accessories work together before approving a look.
The Astria Nano Banana Photoshop plugin brings the source photograph, product references and generated edits into one document. The useful unit of work is a selected garment or accessory, with the rest of the photograph available for comparison.
Watch the reference editing workflow
The demonstration uses a seated model and separate references for shoes, a striped sweater and pearl earrings. It also shows why a sweater swap and a jacket removal are different edits: the jacket can continue covering the intended garment unless the brief addresses both.

00:00 — Original photograph with the dark jacket and light trousers.

01:05 — The reference sweater replaces the dark jacket while the seated composition remains available for comparison.
Select an image to enlarge it. Frames are cropped from the original video.
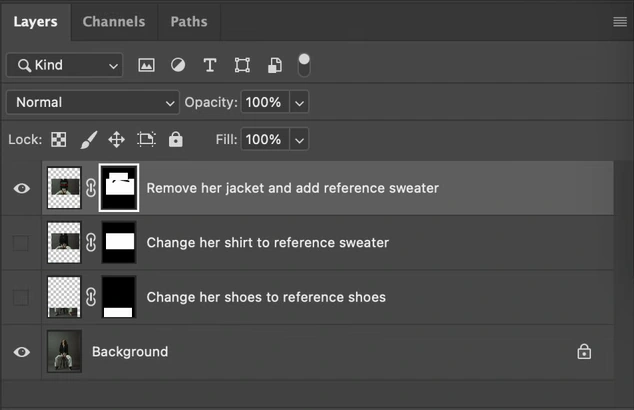
01:05 — Separate masked layers hold the jacket removal, sweater replacement and shoe edit. The original photograph remains on Background.
Watch the original Astria demonstration. The recording shows an earlier plugin interface; use the current panel for the selection, reference-image and returned-layer workflow. Illustrations are stills from that recording.
Choose the reference for the item being changed
A useful product reference shows the item clearly enough to judge the result. For a sweater, include the neckline, cuffs, hem and repeating pattern. For footwear, show the toe, heel, fastening and profile. For earrings, include the complete shape and enough detail to understand the material.
Prepare one reference per editing decision. A mood board can guide styling, but a clear product photograph is the stronger input when the garment or accessory itself must remain recognizable. Keep the source photograph on an untouched layer and attach the reference from an image file or the relevant Photoshop layer using the current panel.
Replace a garment in a controlled sequence
- Select the region occupied by the item, including the boundary where the new material must meet skin or surrounding clothing.
- Attach the product reference and identify which item it should replace. Specify whether an overlapping jacket or accessory should remain.
- Describe the intended change and the person, pose, background and framing to preserve.
- Generate an alternative and toggle the returned layer against the source.
- Refine the mask at cuffs, fingers, hair and garment edges. Use Photoshop adjustments for a local color balance correction.
If the first result already establishes a good sweater, make the next accessory edit from a separately saved version. Keep an approved styling layer available rather than repeatedly changing the only copy. This gives the creative director an intelligible set of options and lets the retoucher undo one decision without rebuilding the rest.
Give each team role a useful deliverable
| Role | Application | Deliverable |
|---|---|---|
| Retoucher | Local garment and accessory replacement | Layered PSD with editable masks |
| Stylist | Compare shoes, knitwear and jewelry combinations | Labeled styling alternatives |
| Creative director | Evaluate the approved outfit in the source composition | Review board with the source and selected option |
| Merchandising team | Explore coordinated collection looks | Concepts associated with the actual product references |
| Ecommerce lead | Decide whether a candidate can represent a SKU | Product fidelity review before export |
Check the product before approving the photograph
Read the garment as a product: count stripes, check where the neckline meets the shoulders, inspect the cuffs and hem, and compare fabric appearance with the reference. A plausible sweater is insufficient if the intended item has a different pattern or construction.
Check the surrounding person too. Hands can merge with a sleeve, shoe proportions can change, and jewelry can shift position. Keep the source available and correct a local problem through the mask or a fresh edit. When an exact catalog detail cannot be retained reliably, use the real product artwork or a conventional composite.
This Photoshop workflow suits individual images receiving careful attention. For producing a collection against a repeatable treatment, see the AI lookbook guide. For installation and general panel behavior, read the Nano Banana Photoshop guide.
Get the Astria Photoshop plugin to try the workflow on your own photograph and product references. Current terms are on Astria pricing.
Frequently asked questions
Can I replace clothing using a product reference in Photoshop?
Yes. Select the garment region, attach a clear product reference in the Astria panel, describe the replacement, and inspect the returned layer against both the source person and the product.
Does a clothing replacement guarantee the exact SKU?
No. Review the pattern, color, neckline, seams, closures and proportions against the reference before using a result as a product image. Use a conventional composite for details that require exact reproduction.
How should a stylist present several outfit options?
Keep the same source photograph and create named layers or groups for each combination. Show the source, proposed styling and associated product references together so the reviewer can judge the specific change.