Nano Banana Architecture in Photoshop for Design Teams
An architect needs to explain a facade option. An interior designer needs to compare finishes in the same room. A development manager needs an image that makes a proposed project understandable to stakeholders. Each needs a visual of a specific change, with the existing design still legible.
The Astria Nano Banana Photoshop plugin lets you start with a sketch, a photograph or an exported model view, describe the change, and review the result in a layered Photoshop document. Use it to explore materials, atmosphere and presentation while keeping the underlying design in your modeling application.
Watch a sketch become a realistic concept
The architecture demonstration starts with a line drawing of a modern house and pool. It creates a daylight interpretation, then explores night lighting, blue pool illumination, outdoor dining and a different viewpoint. The source is already an image in Photoshop.
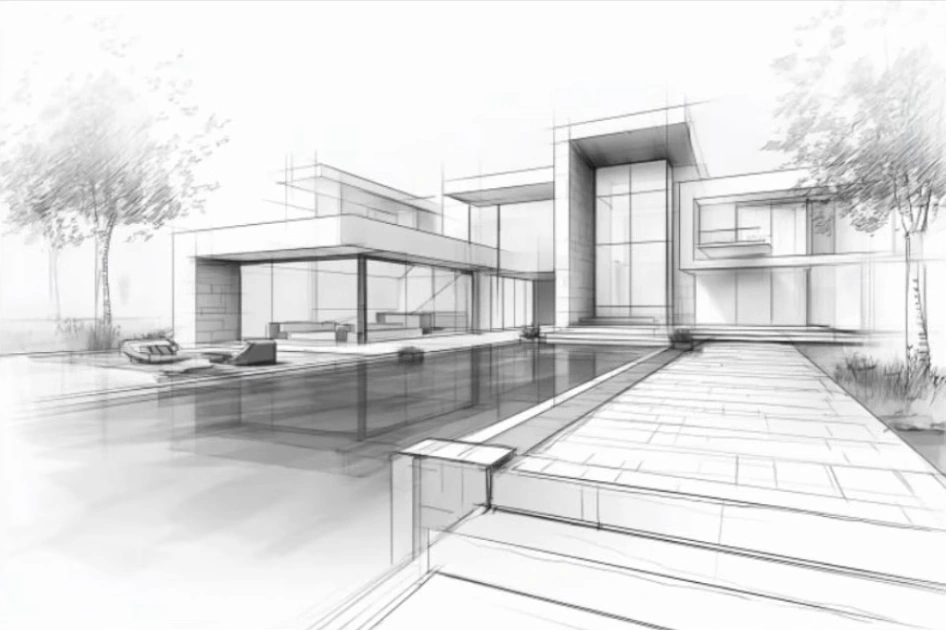
00:00 — The source sketch establishes the house, pool and camera view.
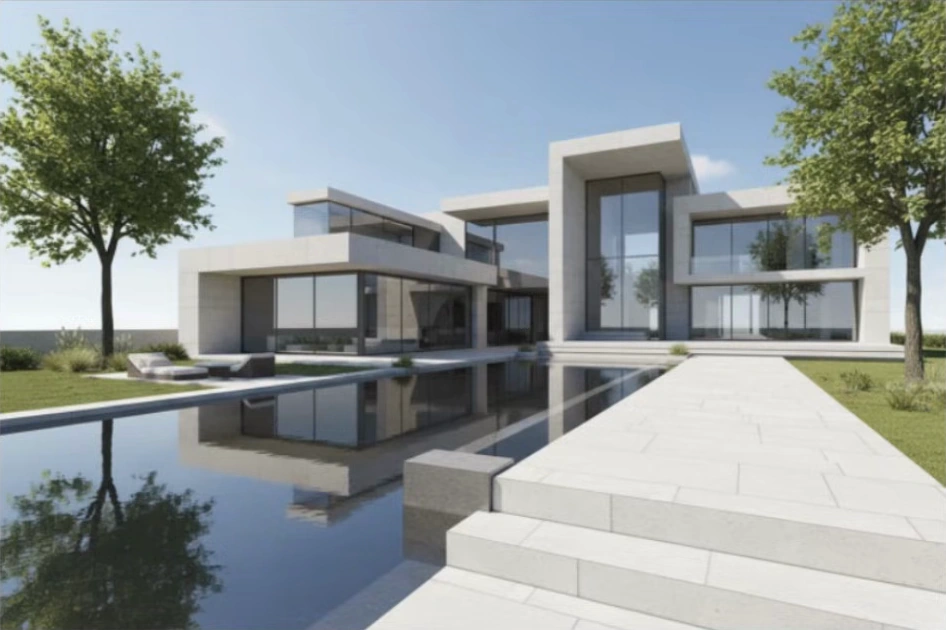
00:12 — The generated daylight interpretation adds materials, glazing, planting and reflections.
Select an image to enlarge it. Frames are cropped from the original video.
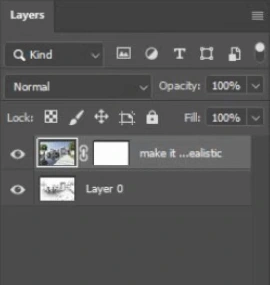
00:12 — The generated image and its mask sit above the original sketch on Layer 0. This is the actual panel from the recording.
Watch the original Astria demonstration. The recording shows an earlier plugin interface; use the current panel for the selection, reference-image and returned-layer workflow. Illustrations are stills from that recording.
Match the image to the project decision
| Team role | Decision to support | Photoshop workflow |
|---|---|---|
| Building architect | Explain the character of an early design | Materialize a sketch or a clay-render export using the intended palette |
| Interior designer | Compare flooring, cabinetry and upholstery | Select one surface or furnishing group and attach finish references |
| Visualization artist | Improve the realism of a model export | Work on material appearance, reflections, planting and atmosphere |
| Lighting designer | Discuss day, evening and pool lighting | Keep the source view fixed and compare separate lighting interpretations |
| Development manager | Communicate alternative schemes or project phases | Export each designed option first, then apply a consistent visual treatment |
| Design director or project lead | Review options with the client | Keep alternatives in named layers and show the same crop for each |
| Developer marketing team | Explain the planned experience of an amenity | Prepare clearly labeled concept images from approved project views |
Explore lighting and viewpoints separately
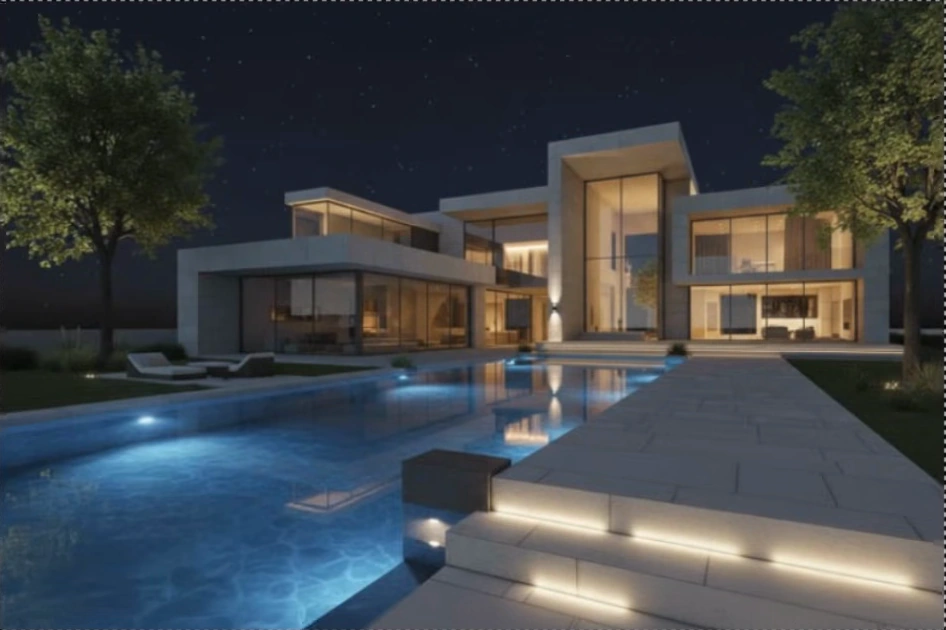
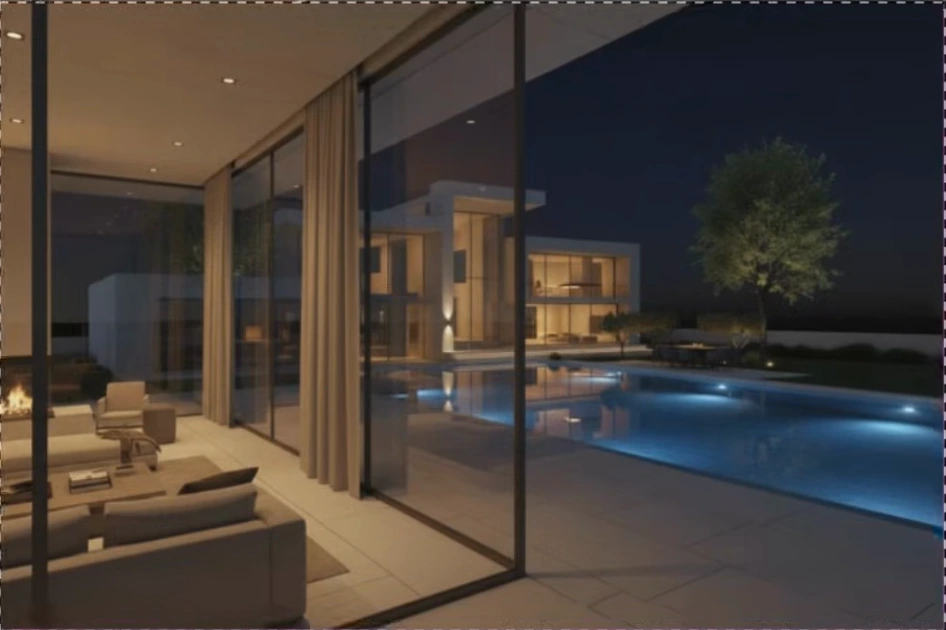
A viewpoint change reveals surfaces the original drawing never supplied. For a client presentation that must match the design, set the camera in Blender, SketchUp or CAD and export that view first. This also lets a project team compare several angles against one authoritative model.
For surface shades, begin with Photoshop adjustment layers when the geometry and texture already work. Use generation when a change needs a new material appearance or reconstructed reflections. Keep lighting variations separate from material comparisons so the brighter image does not become the accidental favorite.
Start with the decision, then choose the size of the edit
A useful architecture image answers a question. Decide what can change and what must remain fixed before generating.
| Level | Typical question | Starting image | Photoshop approach |
|---|---|---|---|
| City or district | How would this approved development sit in its surroundings? | Oblique view exported from a site model | Select the development area; retain surrounding context |
| Neighborhood or campus | What character should the public spaces have? | Massing view with paths and courtyards established | Edit ground treatments, planting, and street furniture |
| Road or street | How would a proposed street redesign look at eye level? | Street photograph with a designed intervention composited into it | Select the proposal footprint; keep buildings and junctions fixed |
| Building | How could this clay model read as a finished building? | Neutral render from the architect's model | Apply a material palette across the full view |
| Renovation | What can change while keeping the existing shell? | Site photograph or proposed-model render | Edit finishes or a separately modeled addition |
| Interior | Which finish and furniture combination suits this room? | Room photograph or render | Change one surface or furnishing group at a time |
| Detail | Would a different screen, handle, or joint treatment work visually? | Close view of the relevant assembly | Make a small selection and inspect at full size |
These are presentation workflows. A realistic image does not establish dimensions, buildability, or performance. Keep the surveyed information, geometry, and technical decisions in the project model and drawings.
Set up the Photoshop document
Export a clear view from your modeling or rendering application, or open a project photograph you have permission to use. For a clay render, make window recesses, slab edges, entrances, and ground levels legible. A featureless white block gives the model little evidence about the intended facade.
Keep an untouched base layer. Save selections for recurring edit areas, and put each alternative in a named group: Facade — brick, Facade — limestone, or Kitchen — oak fronts. Hide earlier alternatives before generating the next one so they do not become part of its input.
Open the Astria panel through Photoshop's Plugins menu. The current plugin requires Photoshop 2025, version 26 or later, on macOS or Windows. Its documented workflow accepts selections and reference images and returns an edit as a new layer. See the plugin and installation page.
In version 2, references can come from an image file or the current Photoshop layer. The panel exposes model-dependent controls and handles contextual capture and blending around the selection. Those conveniences still need a visual check at building edges and material boundaries. Astria's version 2 release notes describe the changes.
For each edit:
- Select the intended area. Use a polygonal selection or a path for planar surfaces. Exclude windows, reveals, fixtures, and other elements that must stay.
- Attach relevant references. Use a material sample for a material edit, a furniture photograph for a furniture edit, or a palette board for a full-view treatment. Name each reference's role in the prompt.
- Choose the model and output settings. Start comparisons at the same supported resolution, with the same output count. Choose a supported resolution suited to the final presentation and inspect the returned pixel dimensions.
- Describe the change and the constraints. State what to alter, which reference governs it, and what to preserve.
- Review the returned layer. Toggle it against the base; inspect the mask, perspective, repeated elements, and neighboring pixels. Refine the mask in Photoshop before showing the option to a client.
For material alternatives, keep camera and lighting consistent. For intentional lighting changes, check whether your panel's Generate menu offers Generate with the prompt only: this omits the added preservation instruction in builds that expose it. Put the geometry and camera constraints in your own prompt, while explicitly allowing the lighting change.
1. Building architects: turn a clay render into a realistic concept
Decision: can the client understand the architectural character before the full material setup is complete?
Start with a courtyard building rendered in neutral gray. Include the actual openings, balcony edges, paving levels, and roofline. Add a reference board containing the intended limestone, bronze metalwork, and paving. Use the whole view as the selection for this first treatment.
Turn the supplied clay render into a realistic architectural concept image.
Use the clay render as the authority for geometry and camera position.
Use the attached material board only for material appearance: pale limestone
on the opaque facade, bronze metal on the existing frames, and warm gray
paving on the existing courtyard surface. Keep the building outline,
number and position of openings, floor count, balcony depths, roofline,
ground levels, crop, and perspective unchanged. Retain the direction of
the source shadows. Introduce realistic surface texture and reflections
without adding architectural elements.
Try Nano Banana 2 and Nano Banana Pro on the same input. Compare the result by counting windows and checking slab edges before judging atmosphere. Add Seedream or another reference-capable model only with the same source, references, prompt, and framing.
The useful before/after shows the clay view beside the materialized view, with matching crops. A more dramatic image that adds a floor or moves the entrance is a failed interpretation of this brief.
“Clay to real” here means visual interpretation. For sun, wind, daylight, or microclimate evaluation, use tools that calculate those quantities from the project data; Autodesk's Forma analysis documentation illustrates that separate workflow.
2. Facade designers: compare materials without redesigning the building
Decision: should the same facade use brick, stone, or metal?
Select the opaque cladding on one elevation. Subtract glazing, mullions, balcony rails, soffits, and neighboring buildings. Save that selection. Generate each option from the original view, with its corresponding material reference.
Replace only the selected opaque facade cladding with the terracotta brick
shown in the material reference. Follow its warm red-brown color variation
and matte surface. Use horizontal running-bond courses with a consistent
module across the elevation. Preserve the existing facade plane, all
window openings, frames, sills, balcony rails, roofline, perspective,
lighting, and everything outside the cladding selection.
For the limestone option, change the material instruction and reference while keeping the remaining brief fixed. Distinguish this design-option comparison from a model comparison, where even the requested material stays identical.
Look closely at corners and window returns: does the treatment wrap convincingly, or does the model paint a flat texture across the openings? Exact bond dimensions, panel sizes, and fixing details belong in the facade design. If a joint must land precisely, draw it or model it and use that as the next reference.
3. Home renovation architects: show a finish refresh and an extension separately
Decision: what can the homeowner achieve by changing finishes, and what requires a physical alteration?
For a finish refresh, use the existing photograph. Select cabinet fronts and end panels, keeping the countertop, appliance openings, sink, and wall geometry outside the selection.
Change only the selected kitchen cabinet fronts and exposed end panels
to the natural oak finish in the supplied sample. Keep grain direction
vertical on the doors. Preserve every door and drawer division, handle
position, appliance opening, countertop, sink, backsplash, room boundary,
camera position, and existing light direction. Keep the countertop edge
and cabinet shadow gaps clearly defined.
For an extension, first model the proposed volume and openings, then export the same camera view. Use that view to explore cladding and atmosphere. Asking the image model to invent an extension from a photograph leaves roof junctions, heights, and internal relationships unresolved.
Present the existing photograph, finish-only proposal, and modeled-extension visualization as separate options with explicit labels. That helps the client understand the scope of each decision.
4. Interior designers: change a floor, then furniture, then the mood
Decision: which material palette works in the actual room?
Begin with one surface. Select the visible floor while excluding furniture, skirting, and door thresholds. Attach a flooring reference that shows several boards or tiles, rather than an ambiguous close-up.
Replace the selected floor finish with the pale oak flooring in the
reference image. Run the boards toward the far window, following the
room's perspective. Preserve the room dimensions, walls, skirting,
door thresholds, furniture positions, and camera. Retain contact shadows
under the furniture and the original direction of daylight. Do not
change any wall or furniture finishes.
Next, make a separate furniture edit with a product reference. Include the object's footprint and contact shadow in the selection. Inspect legs, seams, proportions, and occlusion; reference-based generation does not guarantee an exact catalog match. Composite the actual product cutout when exact product identity is required.
A convincing comparison uses the same room and exposure for both palettes. Otherwise, clients may prefer the brighter picture rather than the better material combination.
5. Detail designers: test a screen, balustrade, or hardware change
Decision: how does a local detail affect the composition?
For an entrance screen, start from a view where its frame and opening are already designed. Select the infill and supply a photograph or drawing of the proposed screen pattern.
Replace only the selected entrance-screen infill with the vertical bronze
fins shown in the reference. Fit the fins inside the existing frame and
follow the perspective of that frame. Preserve the frame outline,
adjacent door, glazing, wall finish, ground, camera, and light direction.
Do not extend fins across the doorway or alter the entrance width.
Compare a mask-aware model such as GPT Image 2 with a reference-capable Gemini model. The question is whether the edit stays local and respects the frame. If exact fin count or spacing matters, place a drawn pattern first and ask for a material treatment of that pattern.
For a paint color, handle swap, or minor alignment correction, a conventional adjustment layer or transformed product cutout may be sufficient. Reserve generation for changes that need a new material appearance, reflected environment, or contextual reconstruction.
6. Neighborhood and campus planners: make a massing study legible
Decision: what would the spaces between the buildings feel like?
Use an oblique site-model view with the building volumes, streets, paths, and courtyards already established. Select one public-space area and provide a landscape palette. Work on one block or courtyard before trying to reinterpret an entire district.
Develop the selected courtyard into a realistic public-space concept
using the supplied paving and planting references. Keep all building
footprints, heights, entrances, street edges, paths, and camera position
as shown in the source model. Add planting only inside the existing
planting beds and benches only within the designated seating areas.
Keep the central walking route open. Preserve the surrounding blocks.
Prepare more than one view from the same underlying model if the proposal needs both an aerial explanation and a pedestrian experience. Treat each generated image as a separate interpretation and check materials and features across views.
For development phasing, export each phase from the model first, then apply a consistent visual treatment. Keep phase colors, boundaries, labels, and legends on ordinary Photoshop layers so the presentation remains unambiguous.
7. City planners and road designers: visualize an approved street proposal
Decision: how can a proposed street change be explained to residents or stakeholders?
Start with a licensed street photograph and a perspective overlay of the designed curb, path, and planting geometry. Select the intervention footprint. The overlay supplies the spatial arrangement; the image model supplies a possible material and landscape appearance.
Render the proposed street intervention shown in the supplied composite.
Use the overlaid curb and cycle-track geometry as the authority for the
layout. Replace the marked parking strip with the shown cycle track and
planting islands. Keep the existing building facades, junction positions,
crossing locations, horizon, camera, and all unmarked street areas
unchanged. Use the attached paving and planting references. Do not add
traffic lanes, move intersections, or invent signs and road markings.
Check continuity through the image: does the cycle track disappear behind a tree, jump across a crossing, or narrow unexpectedly? Keep required markings and labels as deliberate overlays when generation cannot reproduce them reliably.
NACTO's neighborhood-street guidance is useful background for the design conversation. A Photoshop visualization can communicate a proposal; the road layout still needs its normal design and engineering review.
At city scale, use district views to explain an established massing strategy. Retain the authoritative land-use map, transport network, and annotations separately rather than asking the model to redraw them.
8. Landscape architects: compare planting character and seasonal appearance
Decision: should a courtyard feel open and meadow-like, or more structured and shaded?
Start from the same landscape model or photograph. Select the established planting beds, keeping paths, levels, drainage features, and entrances fixed. Supply references for the intended planting character.
Change vegetation only within the selected planting beds to the meadow
character shown in the reference photographs: fine grasses and low
flowering perennials. Keep path edges, paving, retaining walls, ground
levels, existing tree positions, and building entrances unchanged.
Keep planting clear of the visible walking routes. Preserve the camera
and the original lighting.
Make a second seasonal interpretation from the same source, with a season-specific reference. Label it as an illustrative seasonal view. Check species appearance and planting scale against the actual planting schedule; the picture does not establish growth, survival, water use, or cooling performance.
9. Conservation and adaptive-reuse teams: explore reversible interventions
Decision: how would a new use read inside an existing structure?
Use a measured-model view or a project photograph with protected fabric clearly identified. Select only the proposed furniture, freestanding partitions, or new finish area. Attach references for the intervention.
Within the selected area, visualize the freestanding reception desk shown
in the design reference. Preserve the existing masonry, columns, beams,
window openings, floor levels, and all visible historic surface detail.
Keep the desk separate from the existing columns and retain the camera
and light direction. Do not restore, clean, replace, or invent details
on the existing building fabric.
Show the original next to the proposal and identify the added elements. For restoration studies, use archival or measured evidence for missing features; stylistic plausibility is insufficient evidence of what was originally there.
10. Hospitality, workplace, and retail designers: compare fit-out concepts
Decision: how would a different interior identity work within the same shell?
A hotel lobby, office reception, or cafe can share the same method: retain the approved layout and change a defined palette or furnishing group. Use a reference board with clearly labeled materials and objects.
Restyle only the selected cafe banquette and wall panels using the
reference board: muted olive upholstery on the existing seats and
natural walnut veneer on the existing panels. Preserve the seating
layout, table count and positions, aisle boundaries, windows, ceiling,
camera, and light direction. Keep upholstery and veneer assigned to
their specified surfaces. Do not introduce signs or lettering.
Place logos, wayfinding, and exact text as editable Photoshop artwork after the edit. For lighting mood options, work from a separate copy of the approved view and explicitly allow lighting to change. Evaluate illumination levels with the lighting-design workflow, rather than reading them from the generated image.
Choose a model for the architectural edit
Nano Banana is Google's name for a family of image models, not one fixed model. Google's image-generation documentation distinguishes Nano Banana 2 from Nano Banana Pro and describes image-guided editing and resolution options.
The table below is a testing plan, not an architecture benchmark or a ranking. Confirm the current models and controls in your installed panel.
| Model to test | Architecture task | What to compare |
|---|---|---|
| Nano Banana 2 | Clay-to-real and initial material options | Openings, silhouette, perspective, and material assignment |
| Nano Banana Pro | The same clay view or a detailed multi-reference brief | Whether constraints and reference roles survive the edit |
| GPT Image 2 | A selected cabinet, screen, or facade detail | Locality of the edit, edge quality, and surrounding pixels |
| Seedream 5 / 5 Pro | The same facade or interior material brief | Texture scale, repeated patterns, and unintended redesign |
| Flux 2 Pro | The same photographic material or landscape edit | Surface appearance, shadows, and preservation of the source |
Astria lists these model families on its Photoshop plugin page. Resolution and reference support vary by model and integration; verify the selected model's controls instead of assuming every model supports the same settings.
Photoshop's native Generative Fill also supports partner models and reference images, as Adobe documents. Evaluate Astria around its actual panel workflow and available models, rather than the outdated claim that Photoshop only offers Adobe models.
Compare models on the same architectural problem
Choose one base image and one edit. Keep the reference files and their order, prompt, selection, source-layer visibility, aspect ratio, resolution, and output count fixed across compatible models. Record any model-specific control or input-path difference.
For local editing, distinguish what the model returned from what the Photoshop mask reveals. A good final composite can conceal changes elsewhere in the returned image. Review both before claiming that a model preserved the geometry.
Use four checks:
- Geometry: building outline, openings, slab edges, perspective, and repeated elements.
- Reference fidelity: material color, pattern, grain direction, object shape, and scale cues.
- Edit boundaries: unintended changes, halos, broken shadows, and seams.
- Presentation quality: credibility and clarity at the size the client will actually see.
Record manual cleanup separately. A model that needs substantial repair may still be useful, but the repaired composite should not be presented as the untouched output.
Finish with a decision-ready presentation
Show the source and alternatives at the same crop and size. Label the material or design change, identify concept imagery, and keep exact dimensions, notes, and product references editable. Save the layered PSD so the next client comment becomes a specific revision.
The most useful starting exercise is a single material swap on a familiar project. Once that workflow is dependable, extend it to a clay render, an interior palette, or a public-space proposal.
Get the Astria Photoshop plugin, and consult Astria pricing for current terms.
Frequently asked questions
Can Nano Banana turn a SketchUp or Blender render into a realistic image?
Export an image from SketchUp, Blender or your CAD application, open it in Photoshop, and use that view as the reference for an image edit. The plugin edits pixels; it does not import or update the native project model.
Can I change materials and lighting without changing the design?
Select the relevant surfaces, supply material references, and specify the camera and geometry to preserve. Review openings, edges and repeated elements against the source. For an accurate new viewpoint, export that camera from the project model first.
Is an AI architectural image a project simulation?
It is a concept visualization for communicating appearance and comparing design options. Dimensions, construction, daylight, energy and engineering performance require the project model and the relevant analysis tools.